使用Moviepilot实现115网盘+Emby Strm 302播放

Encore4732 2025-06-12 21:13 1
鸽了,本来上周末就要写的,加班实在没时间 。这两天闲下来了,正好写一下~各位佬友们可以参考一下


使用Docker部署Moviepilot,并通过其中的115网盘STRM助手实现strm整理及刮削、MediaWrap插件进行302重定向播放。(注意,此教程更加适用于PT站已经毕业了的人使用)


前段时间购买了115永V,加上家里NAS内存实际上其实不够(本人有点点仓鼠症),想着与其买那么多硬盘不如直接上网盘了。本来想着白嫖OneDrive的E5账号,奈何直连效果确实不佳,且不能配合MP自动下资源(本人懒,追更找资源太麻烦)。我整套流程均部署在腾讯云香港服务器上(2C8G),性能完全够用,本文也会提供海外VPS被115封控导致连接webapi.115.com报错403的问题。废话不多说,直接开始。


组件说明


  • Moviepilot(MP):搜索PT站资源下载,自动追更剧集电影等。详细请看官方WIKI。

  • qBittorrent(Qbit):种子下载客户端。

  • Emby:家庭媒体服务器。

  • Nginx Proxy Manager:反向代理 MP、Qbit、Emby。

  • Clash + proxychains-ng:解决海外 VPS 直连 115 网盘 Web API 被风控导致的 403 问题。


部署流程


配置容器


基本配置


  1. 创建对应文件夹和文件
    mkdir -p /docker_data/media && cd docker_data/media && mkdir video


  2. 编辑docker-compose.yaml
    nano docker-compose.yaml

    services:
    qbit:
    image: linuxserver/qbittorrent:4.6.5
    container_name: qbit
    network_mode: bridge
    environment:
    - PUID=0
    - PGID=0
    - TZ=Asia/Shanghai
    - WEBUI_PORT=8000 # WEBUI端口号,改成你想要的。同下。
    - TORRENTING_PORT=32156 # 做种端口号,改成你需要的,例如改成8080,那么ports mapping部分要改成xxxx:8080
    - QB_PASSWORD=xxxxxx # WEBUI登录密码
    - QB_USERNAME=xxxxxx # WEBUI登录用户名
    volumes:
    - ./qbit:/config
    - ./video:/video # 媒体目录。如果Map别的本地的目录,下面所有媒体目录部分也要跟着一起改。建议别动
    ports:
    - 65036:8000
    - 32156:32156
    restart: unless-stopped

    emby:
    image: amilys/embyserver:latest
    container_name: emby
    network_mode: bridge
    restart: unless-stopped
    ports:
    - 65037:8096
    - 65038:8920
    - 65039:7359/udp
    - 65040:1900/udp
    volumes:
    - ./emby:/config
    - ./video:/video # 同Qbit媒体目录。若上面修改,这里请同步修改
    environment:
    - PUID=0
    - PGID=0
    - GIDLIST=0
    - TZ=Asia/Shanghai
    - EMBY_PublishedServerUrl=xxx.xxx.xxx.xxx # 修改你成本地IPV4
    privileged: true

    moviepilotv2:
    #image: jxxghp/moviepilot-v2:latest
    build:
    context: .
    dockerfile: Dockerfile.mp # 解决海外VPS无法访问webapi.115.com问题,重新打包一下镜像
    restart: always
    stdin_open: true
    tty: true
    container_name: moviepilot-v2
    hostname: moviepilot-v2
    network_mode: bridge
    ports:
    - 65041:3000
    - 65042:65042 # !!如果稍后在MP的MediaWarp环节设置的端口不是65042,这里请记得修改!!
    volumes:
    - ./video:/video # 同Qbit媒体目录。若上面修改,这里请同步修改
    - ./moviepilot:/config
    - ./mp-core:/moviepilot/.cache/ms-playwright
    - /var/run/docker.sock:/var/run/docker.sock:ro
    - ./proxychains.conf:/etc/proxychains.conf:ro # 使用proxychains4强制访问国内的代理绕过海外VPS封控限制
    environment:
    - NGINX_PORT=3000
    - PORT=3001
    - PUID=0
    - PGID=0
    - UMASK=000
    - SUPERUSER=改成你的用户名
    - TZ=Asia/Shanghai
    - AUTH_SITE=leaves # 参考MP WIKI设置认证站点,否则无法使用
    - LEAVES_UID=xxxxxxx #UID
    - LEAVES_PASSKEY=xxxxxxx #passkey
    - GITHUB_TOKEN=xxxxx # 设置Github Token防止获取插件过于频繁导致风控
    depends_on:
    - clash

    clash:
    image: dreamacro/clash
    network_mode: bridge
    restart: always
    volumes:
    - ./clash:/root/.config/clash
    container_name: clash
    ports:
    # 主机http代理端口:容器http代理端口,默认7890
    # 主机sock5代理端口:容器sock5代理端口,默认7890
    # 主机REST API端口:容器REST API端口,默认9090
    - 7890:7890
    - 7891:9090

    为什么要有Clash还要proxychains4?"}
    尽管你可以给`MP`容器配置http_proxy、https_proxy等环境变量来一定程度上接管流量,但是实测,只有`MP`自己的`115 OpenAPI`会遵循环境代理,而`MP`里的`115网盘STRM助手`这个插件(里面的[p115client](https://github.com/ChenyangGao/p115client)这个python依赖)不honor环境变量,导致请求`webapi.115.com`依然不走回国代理。所以出此下策使用proxychains4强行接管`MP`容器流量到`Clash`容器。


  3. 编辑Dockerfile.mpentrypoint-wrapper.shproxychains.conf
    nano Dockerfile.mp

    FROM jxxghp/moviepilot-v2:latest

    # 切换到 root 用户以安装软件包
    USER root

    # 更新包列表并安装 proxychains-ng
    # jxxghp/moviepilot-v2 通常基于 Debian/Ubuntu
    RUN apt-get update && \
    apt-get install -y proxychains-ng && \
    rm -rf /var/lib/apt/lists/*

    # 复制包装器脚本到镜像中
    COPY entrypoint-wrapper.sh /entrypoint-wrapper.sh
    RUN chmod +x /entrypoint-wrapper.sh

    # 使用包装器脚本作为新的入口点
    # 原镜像的 ENTRYPOINT 是 ["/entrypoint.sh"]
    # 我们用 proxychains4 来执行它
    ENTRYPOINT ["/entrypoint-wrapper.sh"]

    nano entrypoint-wrapper.sh

    #!/bin/sh
    # 使用 proxychains4 执行原始的 /entrypoint.sh 脚本,并传递所有参数
    exec proxychains4 /entrypoint.sh "$@"

    nano proxychains.conf

    # /etc/proxychains.conf
    strict_chain
    proxy_dns

    localnet 127.0.0.0/8
    localnet 172.16.0.0/12
    localnet 10.0.0.0/8 # 改为你本地的IPV4 CIDR

    [ProxyList]
    http 172.17.0.1 7890


  4. 配置clash
    mkdir clash && nano ./clash/config.yaml

    mixed-port: 7890
    allow-lan: true
    mode: Rule
    log-level: info
    #external-ui: dashboard
    external-controller: "0.0.0.0:9090"
    proxies:
    - {name: test, server: xxxxx.com, port: 2054, type: ss, cipher: aes-256-gcm, password: xxxx} # 替换成你自己的代理,这里只是举例
    proxy-groups:
    - name: PROXY
    type: select
    proxies:
    - test
    rules:
    - DOMAIN-KEYWORD,115.com,PROXY
    - MATCH,DIRECT


  5. 启动服务
    docker compose up -d


配置Qbit


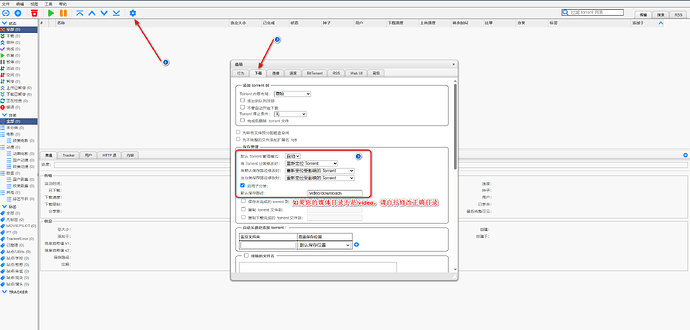
  1. 进入WEBUI界面,如图进行配置


配置MP


基本配置


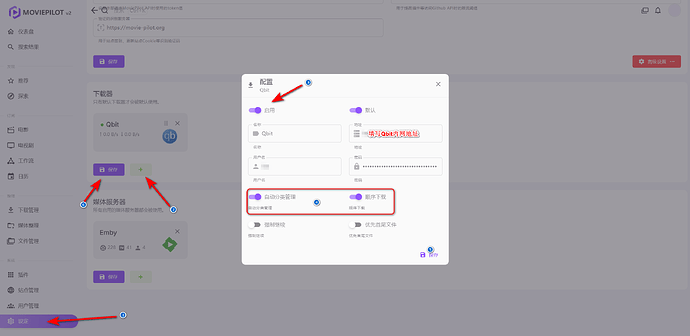
  1. 配置下载器。请一定记得打开自动分类管理顺序下载


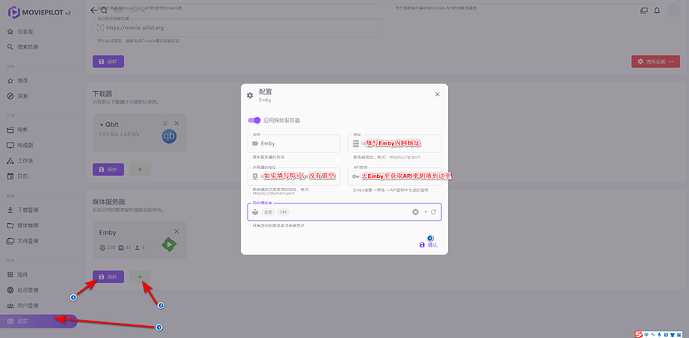
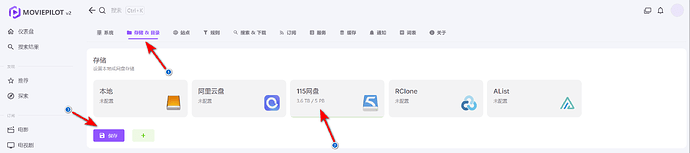
  2. 配置媒体服务器,存储&目录


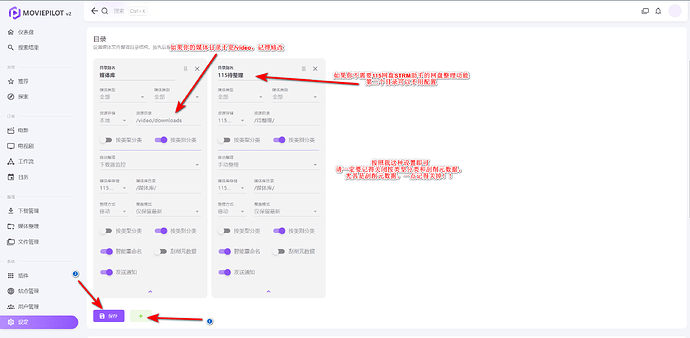
    登录完成显示容量后再进行下一步目录配置。自动整理请一定记得改为下载器监控模式。


插件配置


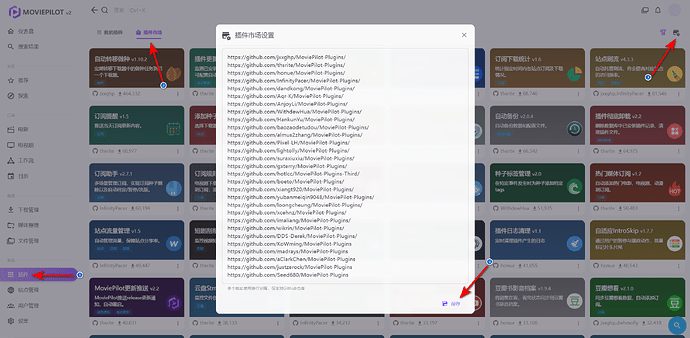
  1. 配置插件源。如图复制粘贴。确认后,等待一会,然后搜索插件115网盘STRM助手MediaWarp这两个插件,安装即可。

    https://github.com/jxxghp/MoviePilot-Plugins/
    https://github.com/thsrite/MoviePilot-Plugins/
    https://github.com/honue/MoviePilot-Plugins/
    https://github.com/InfinityPacer/MoviePilot-Plugins/
    https://github.com/dandkong/MoviePilot-Plugins/
    https://github.com/Aqr-K/MoviePilot-Plugins/
    https://github.com/AnjoyLi/MoviePilot-Plugins/
    https://github.com/WithdewHua/MoviePilot-Plugins/
    https://github.com/HankunYu/MoviePilot-Plugins/
    https://github.com/baozaodetudou/MoviePilot-Plugins/
    https://github.com/almus2zhang/MoviePilot-Plugins/
    https://github.com/Pixel-LH/MoviePilot-Plugins/
    https://github.com/lightolly/MoviePilot-Plugins/
    https://github.com/suraxiuxiu/MoviePilot-Plugins/
    https://github.com/gxterry/MoviePilot-Plugins/
    https://github.com/hotlcc/MoviePilot-Plugins-Third/
    https://github.com/boeto/MoviePilot-Plugins/
    https://github.com/xiangt920/MoviePilot-Plugins/
    https://github.com/yubanmeiqin9048/MoviePilot-Plugins/
    https://github.com/loongcheung/MoviePilot-Plugins/
    https://github.com/xcehnz/MoviePilot-Plugins/
    https://github.com/imaliang/MoviePilot-Plugins/
    https://github.com/wikrin/MoviePilot-Plugins/
    https://github.com/DDS-Derek/MoviePilot-Plugins/
    https://github.com/KoWming/MoviePilot-Plugins
    https://github.com/madrays/MoviePilot-Plugins
    https://github.com/aClarkChen/MoviePilot-Plugins
    https://github.com/justzerock/MoviePilot-Plugins
    https://github.com/Seed680/MoviePilot-Plugins


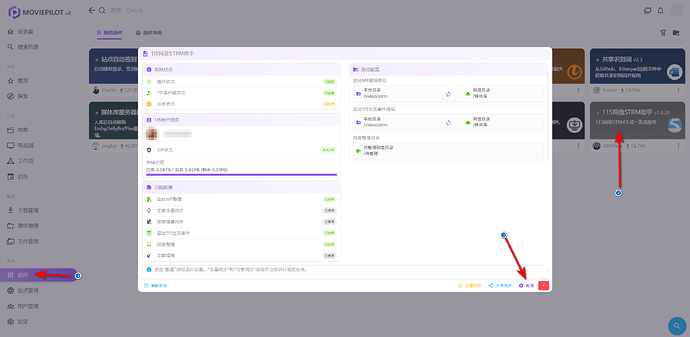
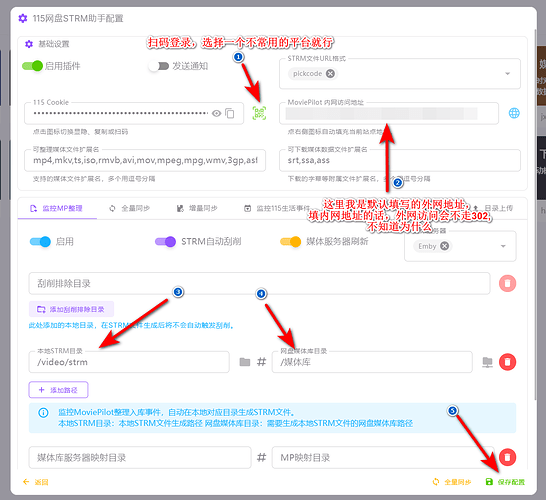
  2. 配置115网盘STRM助手。记得选上媒体服务器。


    如果你没改过`docker-composeyaml`里的volume mapping的话,这里不需要填写`媒体库服务器映射目录`# `MP映射目录`。这里具体什么意思呢?如果你把本地的`./video`映射为了`MP`容器里的`/video`,但是在`Emby`容器里是例如:`./video:/media`,那么这里就需要填写了。`媒体库服务器映射目录`填写`/media`,`MP映射目录`填写`/video`。否则会导致插件刷新媒体库失败。


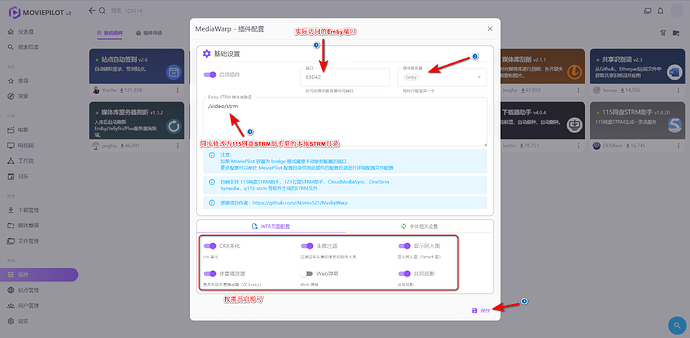
  3. 配置MediaWarp

    注意,这里的端口的意思是你后期进入Emby的实际端口,设置后,访问`http://xxx.xxx.xxx:65042`即可进入`Emby`界面。如果你这里修改为了别的端口,记得同步修改`docker-compose.yaml`里`MP`容器部分的port mapping设置。


后续使用


至此,配置全部完成。


  • 在 MP 中搜索资源,自动下载至本地 ./video/downloadsMP检测下载器下载完成,自动推送视频到115网盘,并根据分类自动在网盘创建对应文件夹。

  • 115网盘STRM助手会在本地./video/strm自动创建对应目录,生成strm文件和刮削文件。

  • 至于Emby添加媒体库乱七八糟的就不过多赘述了,docker-compose.yaml里的Emby镜像默认是开心版,自带神医插件。(因为我没怎么使用过神医插件,也就不介绍了)


本人博客原文:https://blog.useforall.com/post/15

最新回复 (19)
  • Yep 06-12 21:36
    1

    顶顶,正好需要

  • crain 06-12 21:37
    2

    正好需要,有时间折腾下

  • 大帅哥 06-12 21:38
    3

    感谢大佬教程

  • Once 06-12 22:18
    4

    mark一下,感谢佬的分享

  • 李太白 06-13 00:09
    5

    感谢大佬教程

  • Taja 06-13 00:21
    6

    有点复杂,现在115阉割 了吧,没有vip还能用?

  • kitsune 06-13 07:15
    7

    123、115等通过302观看的网盘,都需要vip才会有速度

  • 魏东培 06-13 07:24
    8

    太厉害了

  • Encore4732 楼主 06-13 08:44
    9

    没vip是没法用,但是115年费也便宜啊^-^其实部署下来没几个步骤

  • BenSu 06-13 09:09
    10

    大佬太牛了

  • OnlyZ 06-13 16:18
    11

    自动下载至本地 ./video/downloads


    如果在服务器上部署,视频是会下载到服务器上吗?

  • Encore4732 楼主 06-13 17:59
    13

    这里的本地说的就是你部署这个mp服务的服务器上

  • 一晚好梦 06-13 18:08
    14

    感谢分享

  • 师少一 06-20 12:02
    15

    感谢大佬分享 ^-^

  • abnerchen 06-20 13:02
    16

    115风控很严,这个问题大佬怎么解决的那

  • Encore4732 楼主 06-20 17:49
    17

    这个方法没遇到风控,硬要在网盘上刮削,那肯定会被风控。这套流程刮削在本地,115里本质上只有视频

  • Once 06-23 21:03
    18

    佬,你知道CloudMediaSynC这个程序吗,是不是跟你这个实现思路差不多,但是不知道这个程序能不能直接解决海外 VPS 直连 115 网盘 Web API 被风控导致的 403 问题。

  • X. 06-26 16:25
    19

    那服务器硬盘空间是要很大么

  • mingus 06-26 16:40
    20

    好麻烦 飞牛os 直接挂载115或者百度网盘;飞牛影视添加媒体库后 直接自动刮削就搞完了。

* 帖子来源Linux.do
返回